Whether you want to record a video interview for your YouTube channel or a virtual event, the Zoom application is one of the best solutions out there. However, some of the settings might be confusing for a beginner so in this article, you will find step-by-step instructions on how to set up Zoom for a perfect, high-quality video recording.
Topics covered in the video:
00:21 Introduction01:00 Differences between FREE and PRO accounts
02:15 Free account video settings
03:00 Recording with HD quality
03:58 “Mirror my video” setting
04:21 “Touch my appearance” setting
05:29 Local recording settings in a FREE account
06:45 Recording with screen sharing
09:16 Cloud recording settings in a PRO account
12:25 Example of a video recording
13:01 Screen sharing option during a call
13:44 Screen sharing option without thumbnails
Differences between FREE and PRO Zoom accounts
First of all, let’s see what are the differences between using free and pro accounts so you can decide whether a free version is enough for you:
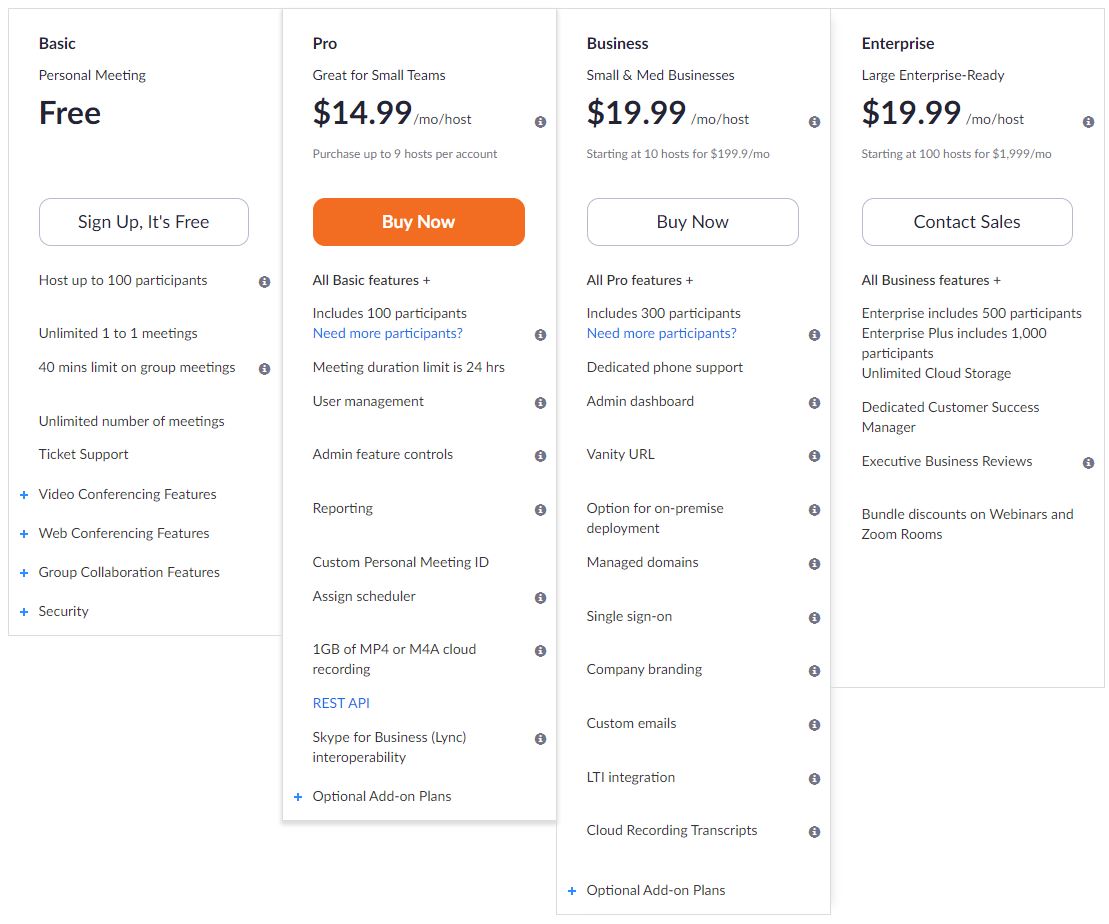
It’s important to point out that 40 minutes limitation on group meetings only applies when you have a call with 2 or more people, meaning you can record longer interviews as long there is a 1-on-1 conversation. On the other hand, having Zoom pro account you don’t need to worry about any of this, plus you get 1GB of cloud storage where you can keep your recordings. That’s definitely on of the most crucial differences between these two.
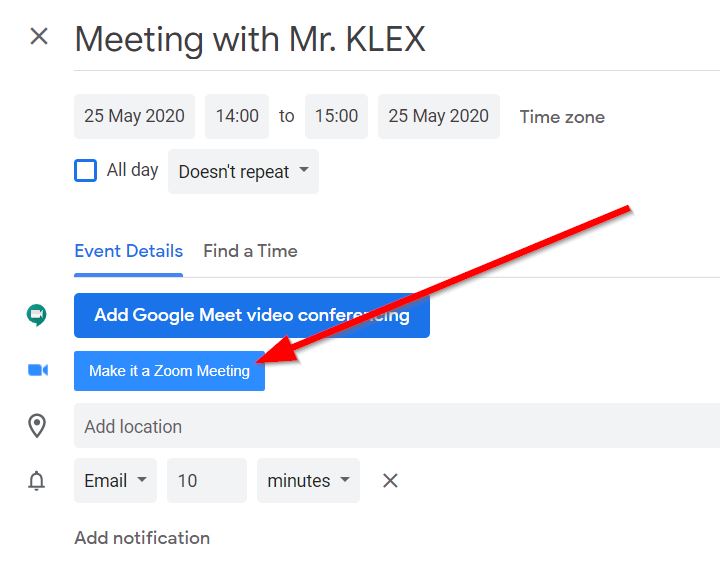
Another beneficial feature in a pro account is API (Application programming interface). This feature lets you integrate your calendar booking apps, like Book Like a Boss, Calendly, Google calendar and many others, with Zoom. For example, if you use Zoom’s browser extension, you can automatically add a Zoom event inside Google calendar description by clicking a [MAKE IT A ZOOM MEETING] button.
Free Zoom account video recording settings
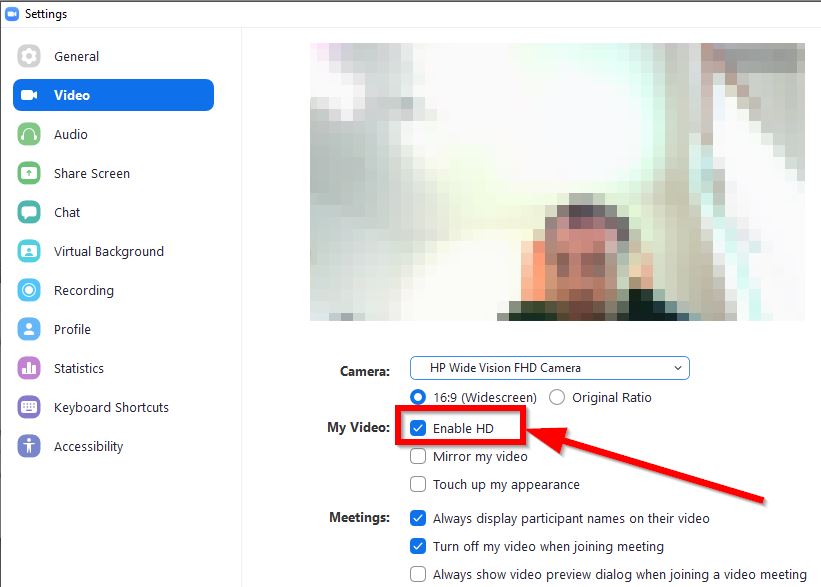
Enable HD
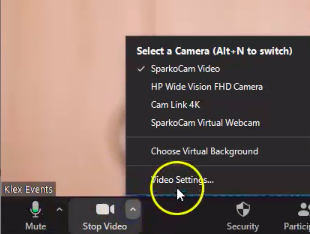
First, to access video recording settings, go to the bottom left corner of your Zoom meeting window and click on the arrow next to the camera icon. Choose “Video settings”:
When setting up for a video interview, do not skip on the “Enable HD” setting which is indeed the most important one. If you don’t enable high-definition video, you’ll end up having only a 360p video which won’t be very appealing on Youtube, for example.
Mirror my video
Actually, this setting does not affect the final quality of a video. It only flips your video horizontally, as in the examples below.
On the left, you see the original view and on the right, there is an example of how does a mirrored view look like:
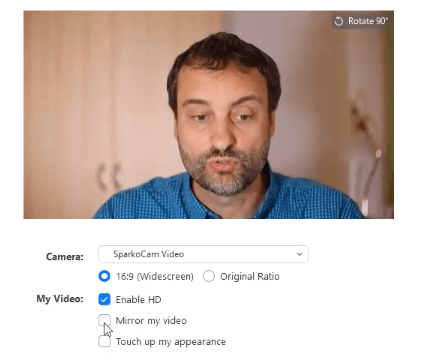
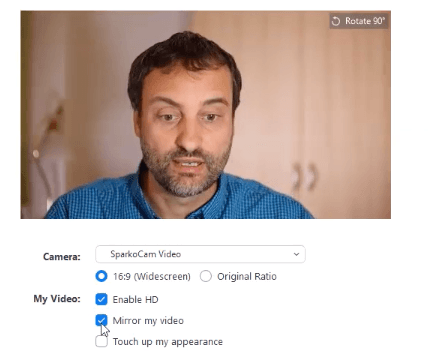
It’s not likely this mirror view would be anyhow useful when recording a face-to-face interview.
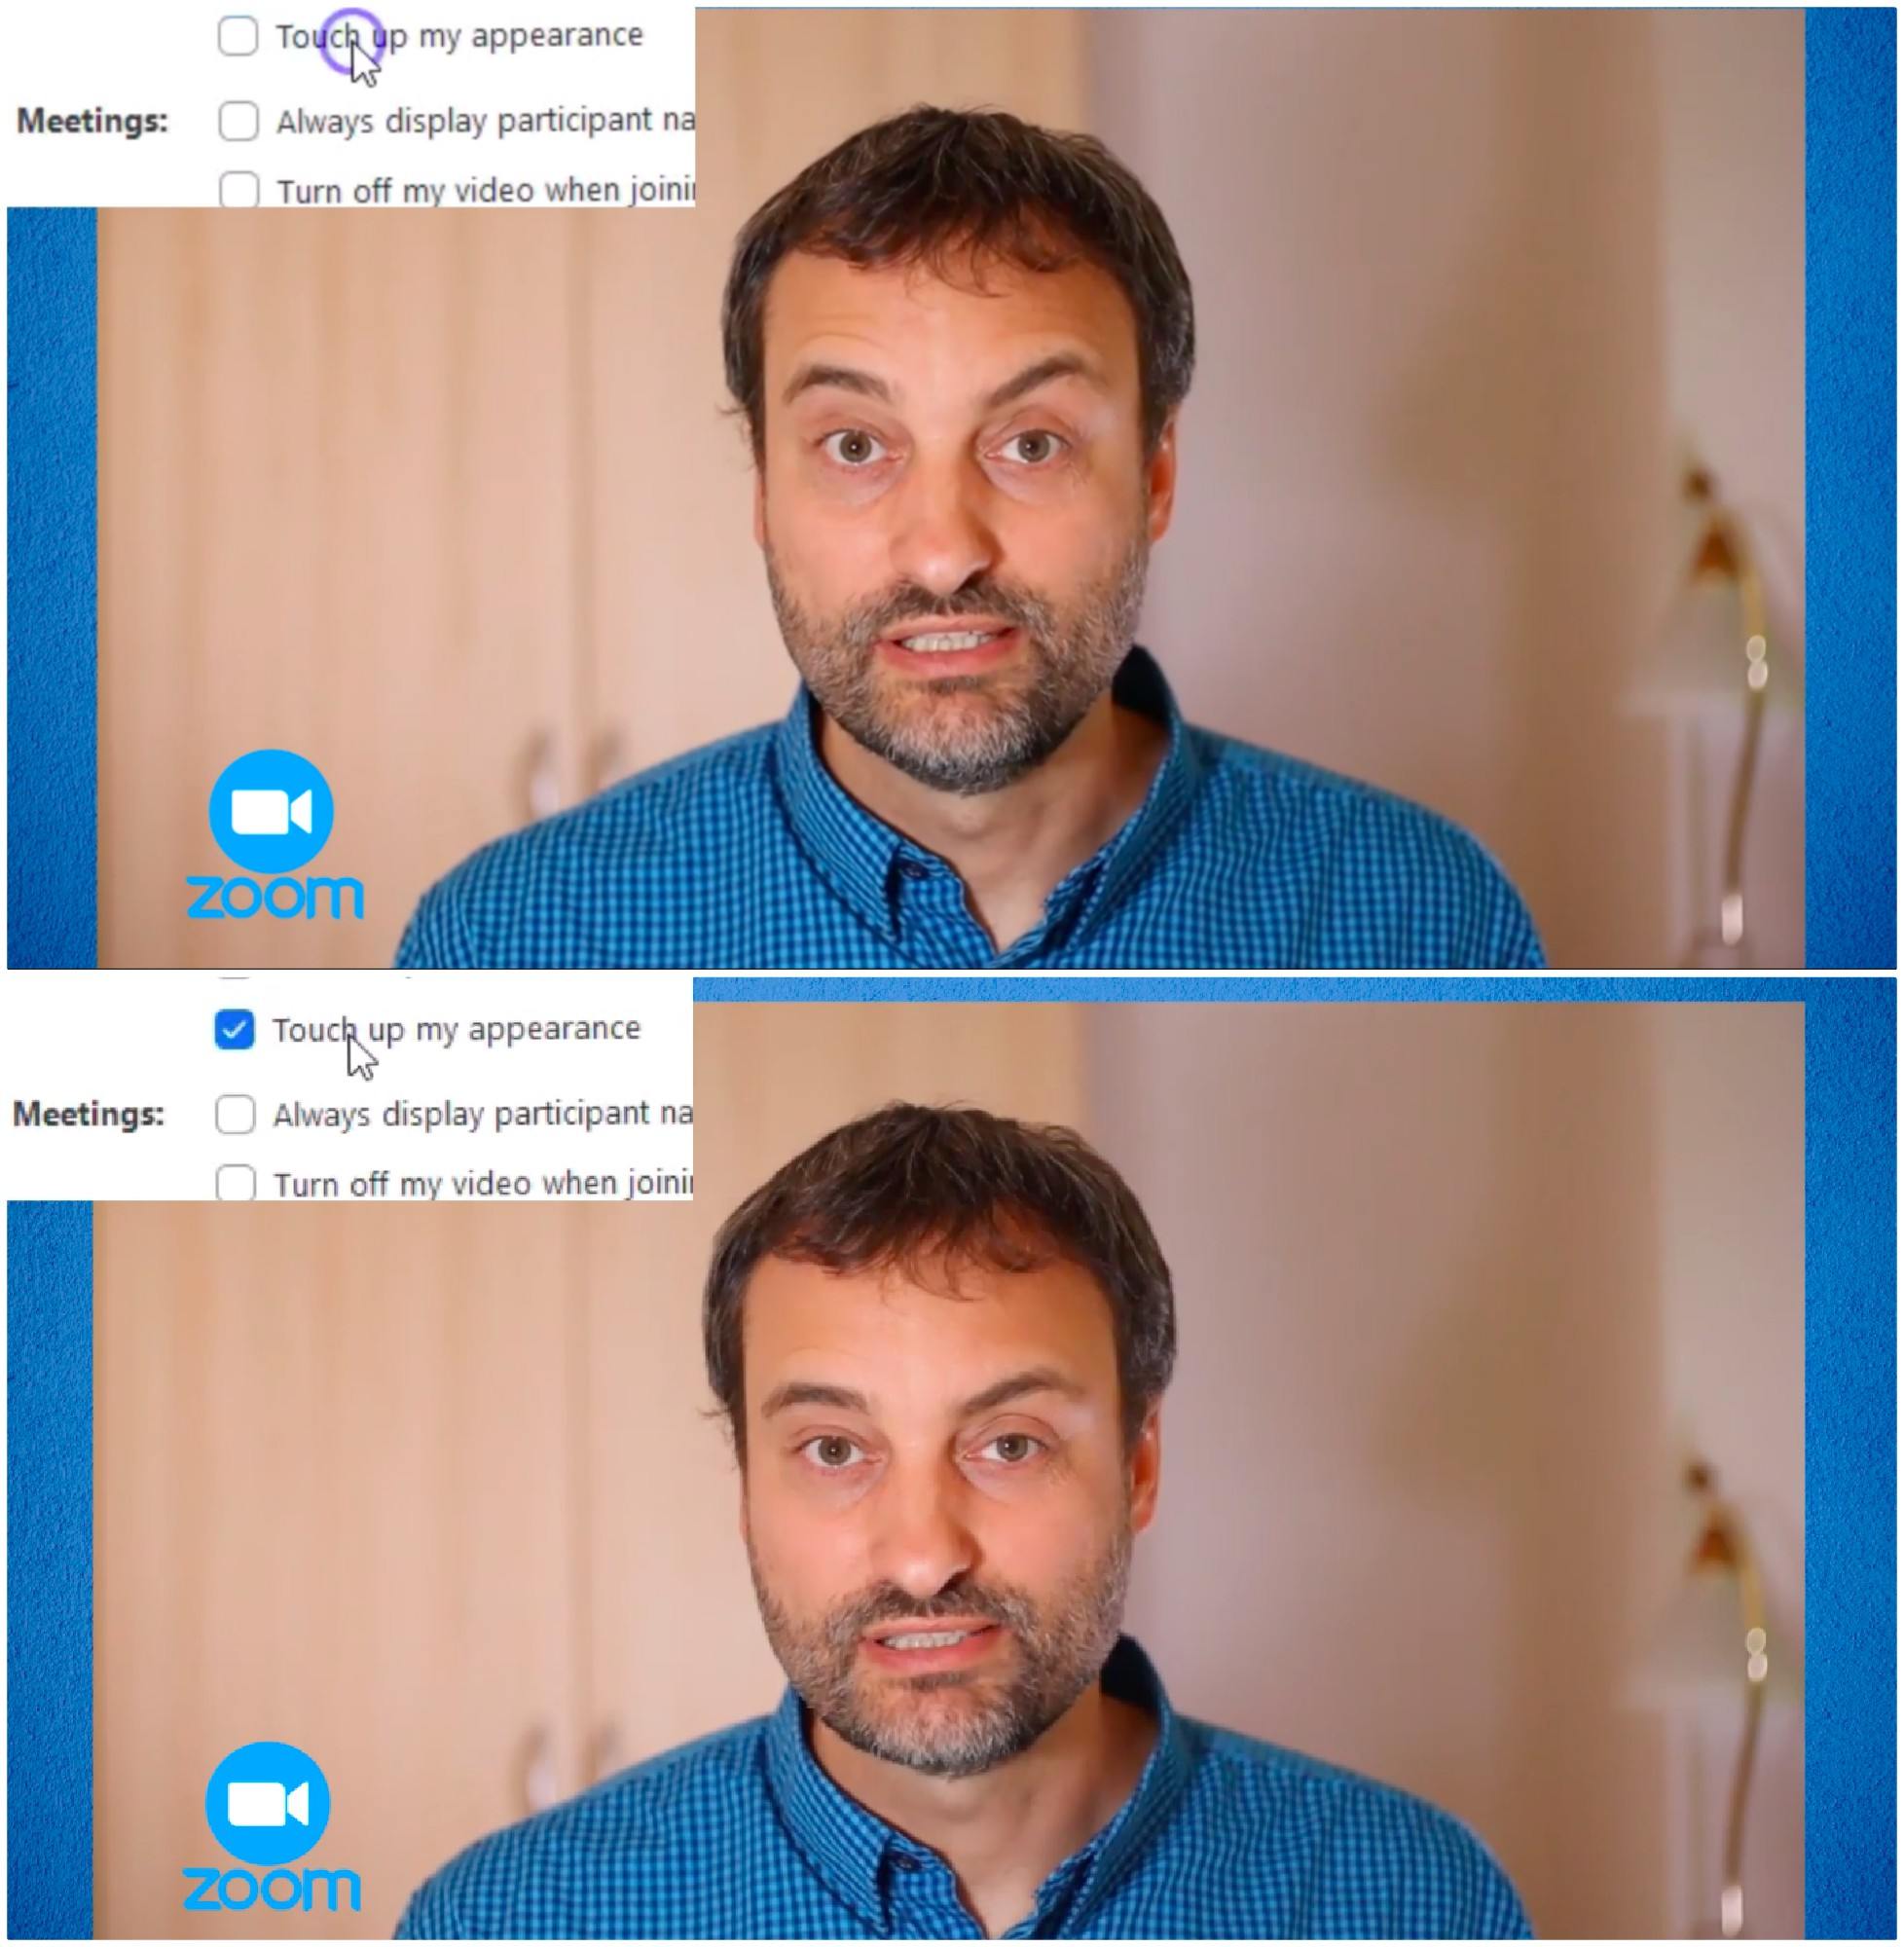
Touch my appearance
In case you feel your appearance needs a small touch to look smoother in the video, you can use the “Touch my appearance” setting. The example below shows the difference between the original video and the one with the setting enabled. Even though the difference is not clearly noticeable, you can spot a bit of a difference in the skin tone – the setting works exactly the same as some Instagram filter:
That’s it – these 3 settings are the only ones you can apply before your video recording. Now let’s jump into recording settings.
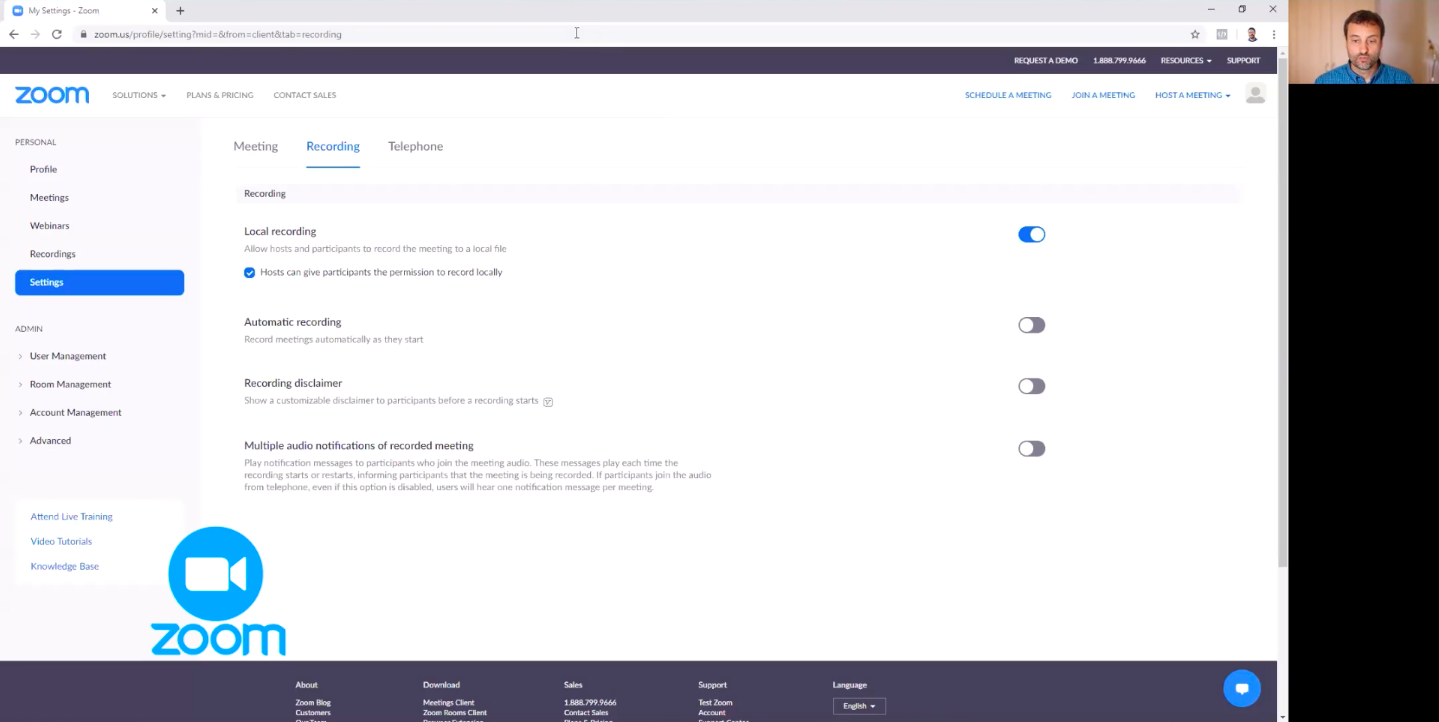
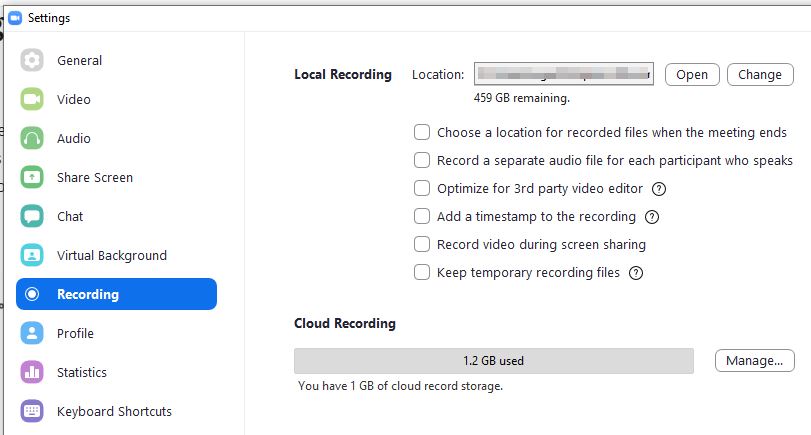
Zoom local recording settings
When using a free Zoom account, you are able to access local recording settings only (versus Cloud recording, which is only available in a Pro account).
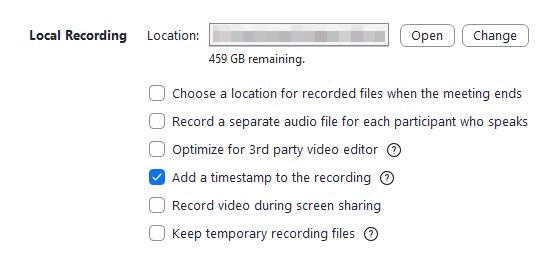
Active timestamps
When recording an interview, you can add timestamps to your video by enabling “Add a timestamp to the recording” setting:
After doing so, the timestamp will appear on the bottom right corner of your video:
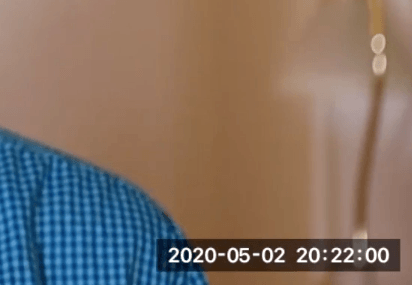
In most cases, you won’t need to have a timestamp in your recording, so make sure it’s turned off.
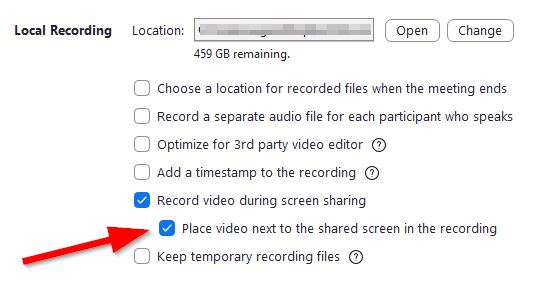
Record video during screen sharing
This is a very important setting. When doing a screen share on a video call, you might want your video to appear at the corner of the screen. In this case, enabling this setting will let you do so.
In the example below, you see how your video looks on the screen when you start screen sharing:
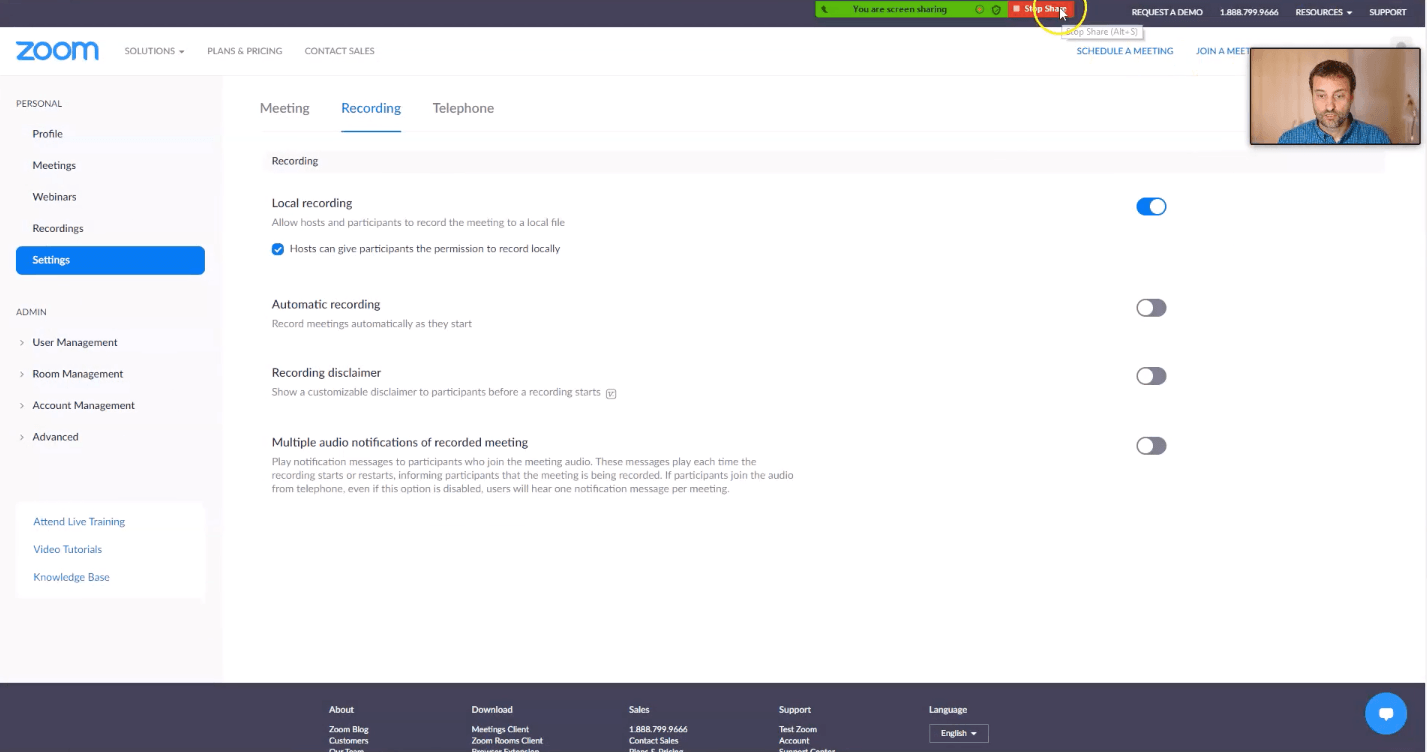
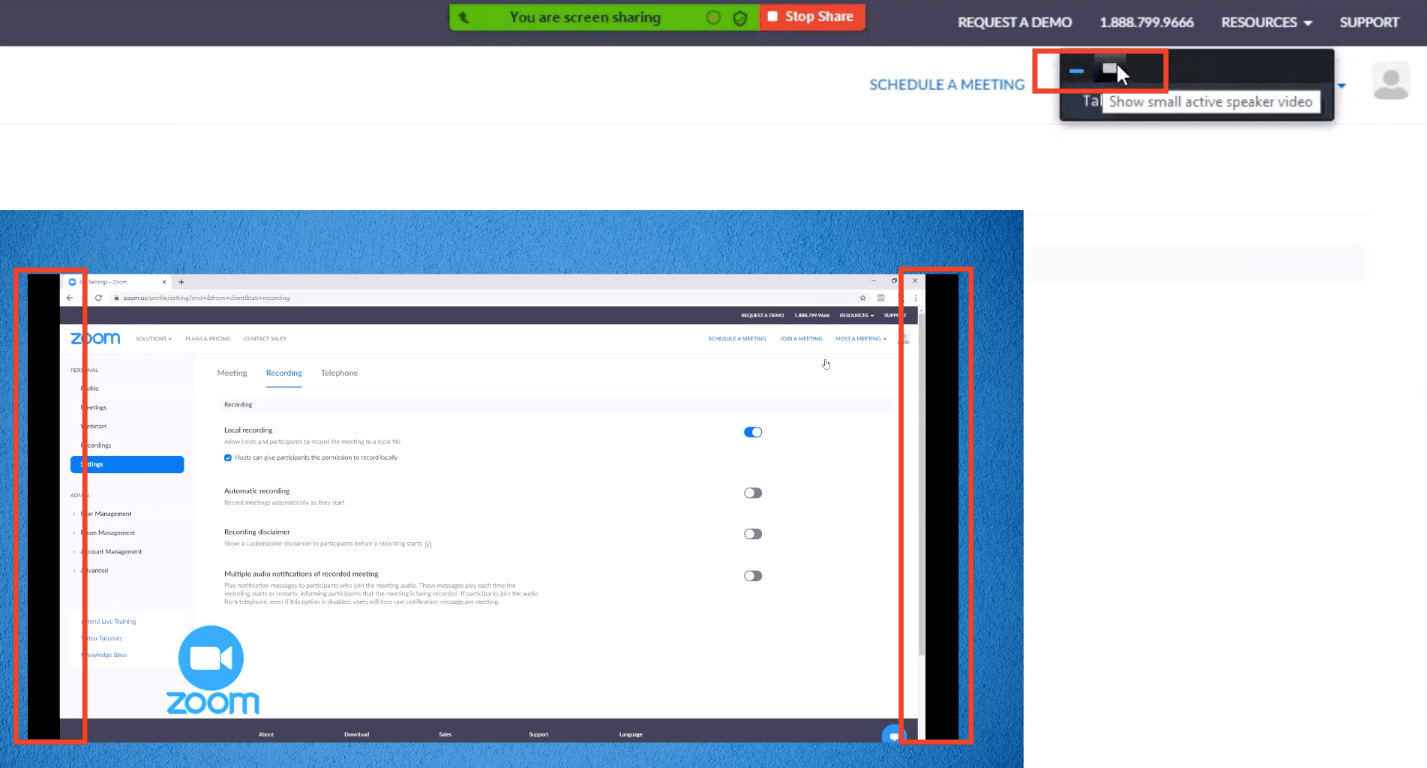
Now let’s look at how easily you can turn it on/off while recording a video. At the top right corner, you can see an active speaker thumbnail that has show/hide options available. By clicking any of those, you can either show or hide an active speaker box while screen sharing:
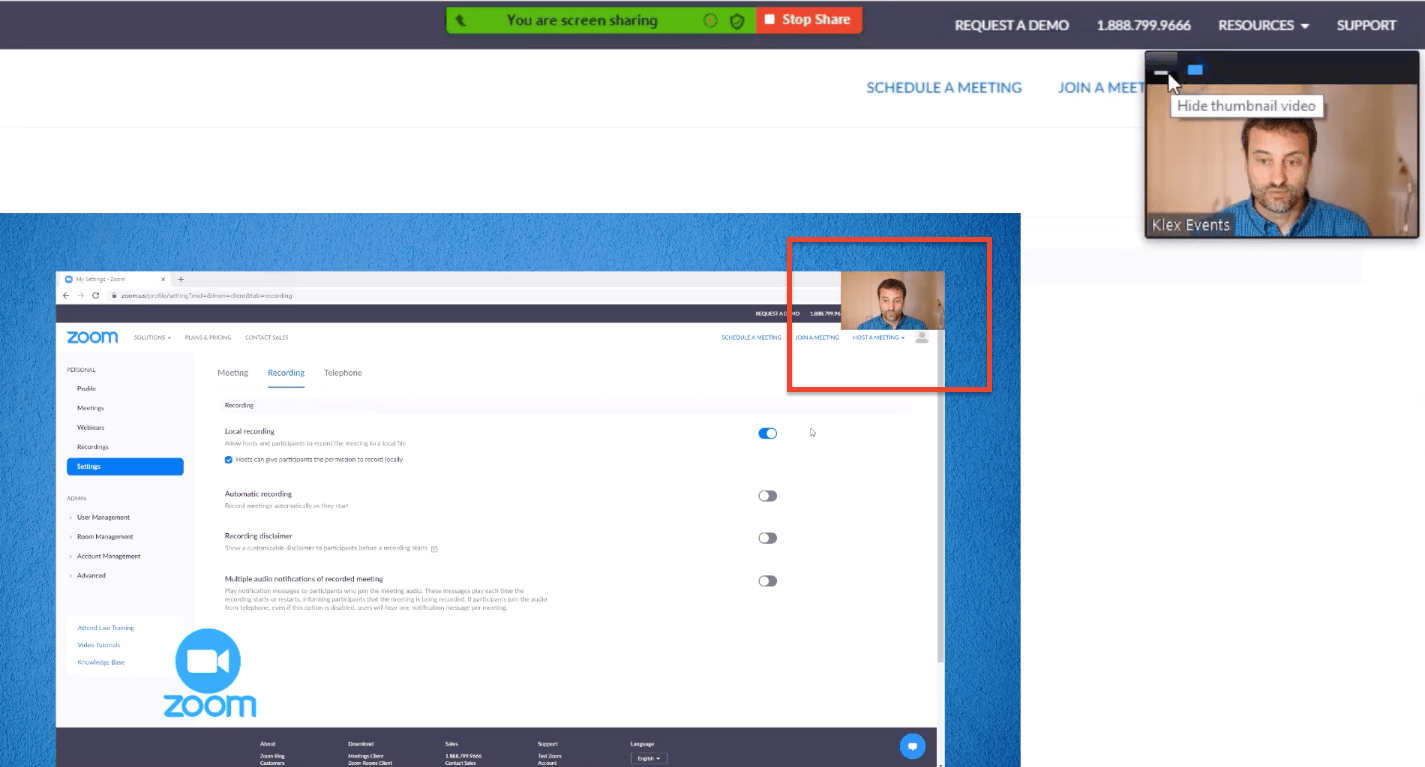
As you see, when the speaker’s thumbnail is active, it’s blocking the right upper corner. If you don’t want this to happen, select “Place video next to the shared screen in the recording”:
Here’s what happens when you choose this option:
The right side of the screen is now stretched and has empty black space as a result. Even though you hide the speaker thumbnail, there are still black margins on both sides of the screen:
If you don’t want this to happen, make sure you this setting is disabled!
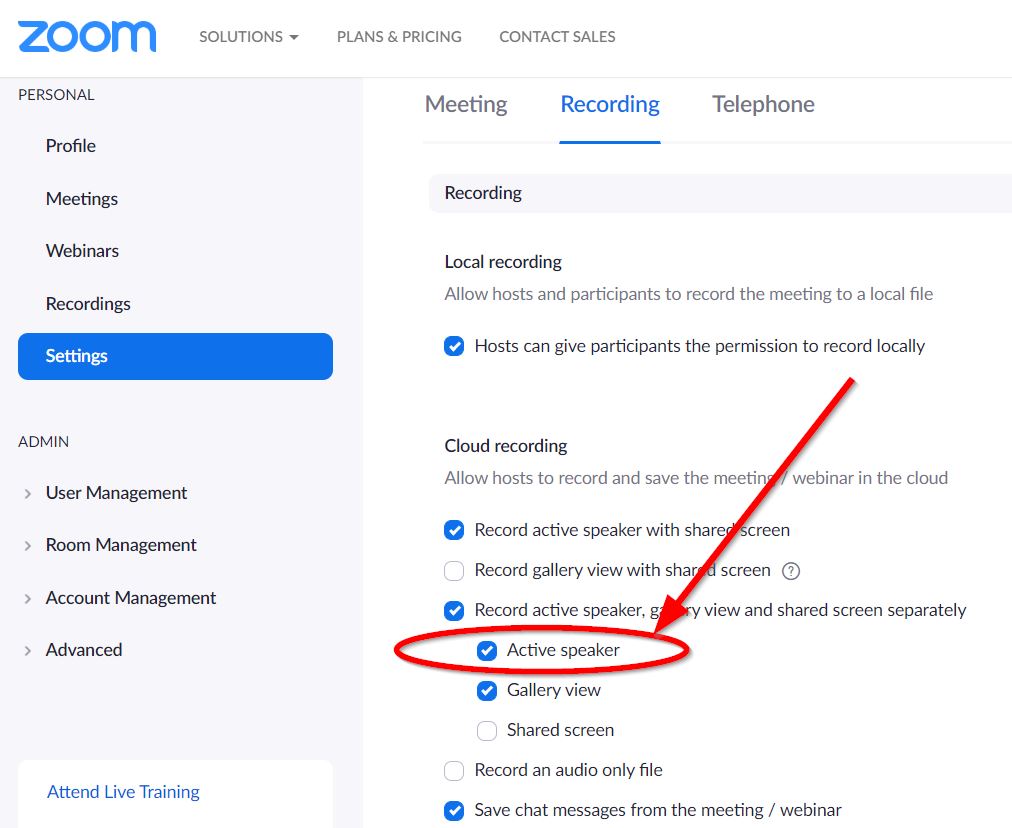
Cloud recording settings in a Zoom PRO account
Contrary to what we had in a free Zoom account, PRO account offers cloud storing for your video recordings so you can keep all your videos without saving them to your computer. For the $14.99/month, you get 1 GB of cloud space.
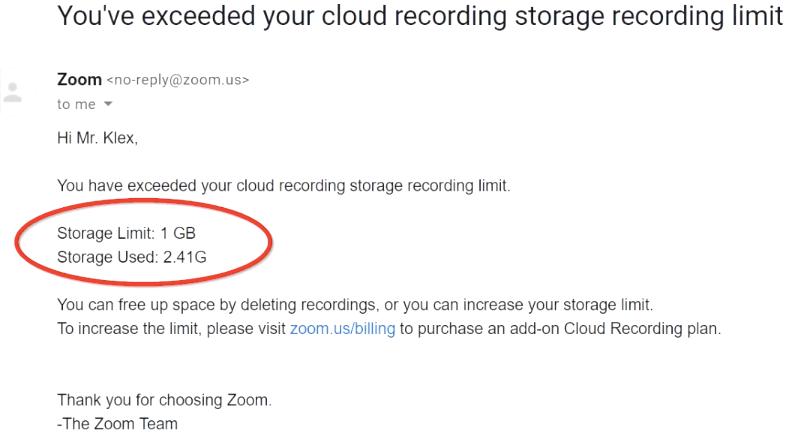
Once you exceed this limit, Zoom will surely let you know. However, even if you exceed the limit, it doesn’t affect you in any way – Zoom doesn’t remove your videos or charge extra. This is the email I got after exceeding the cloud storage limit:
You can access your video recordings by logging in to your Zoom account and selecting the menu “Recordings”:
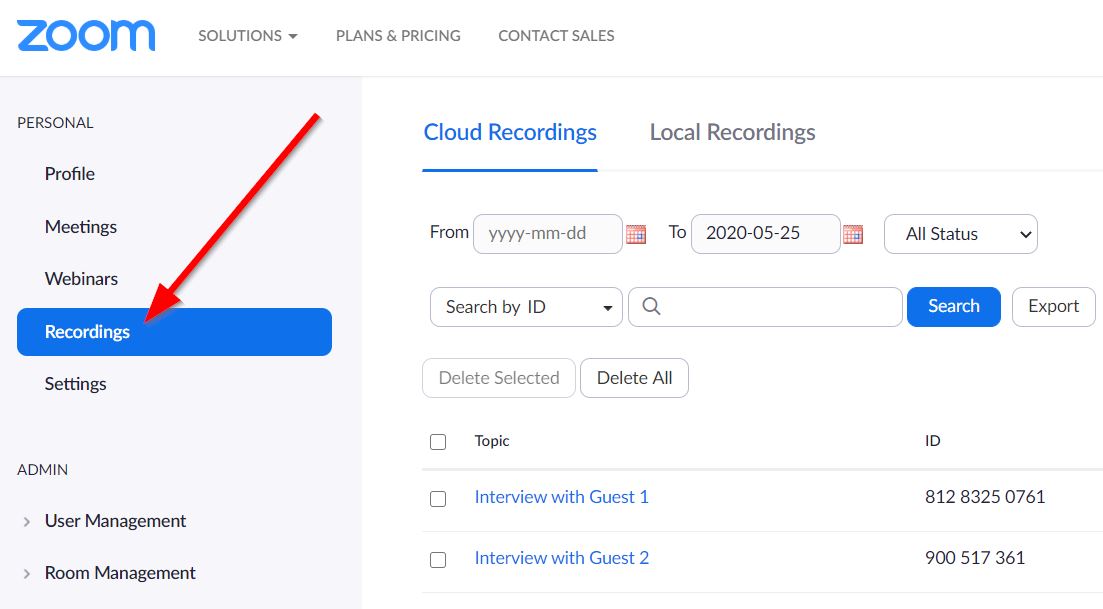
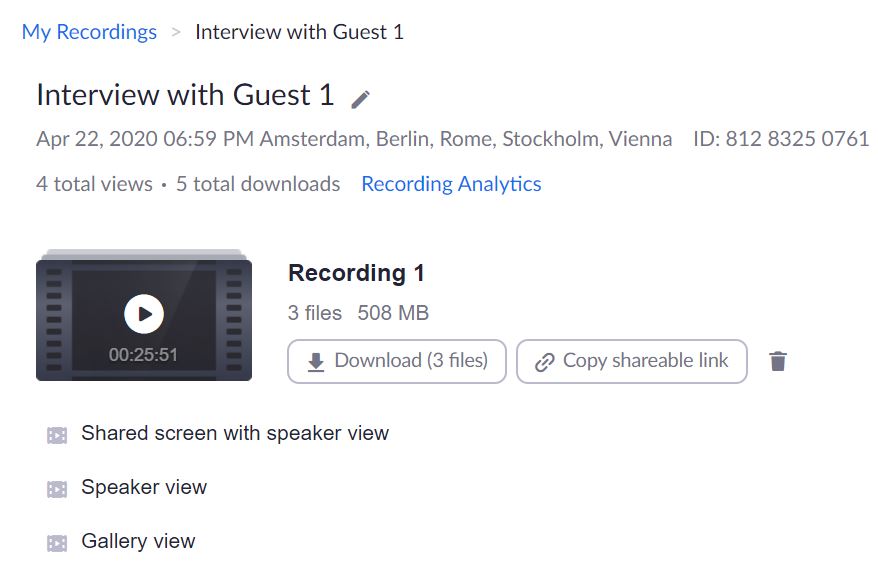
By clicking on any of these videos, you can select how you want these files to be downloaded – you can download them all at once (shared screen recording, speaker view and gallery view) or separately. In any case, after you download your files, make sure you delete it from the cloud storage.
In the following section, you will see how does the final video interview looks like when applying different settings.
Video recording example using Zoom PRO account
In this part, you will see what specific settings I choose for my video recordings as well as the final result. Before diving into it, there is something you must keep in mind before your interview – when you update your settings, you need to log out from your Zoom application so the settings will be applied once you log back.
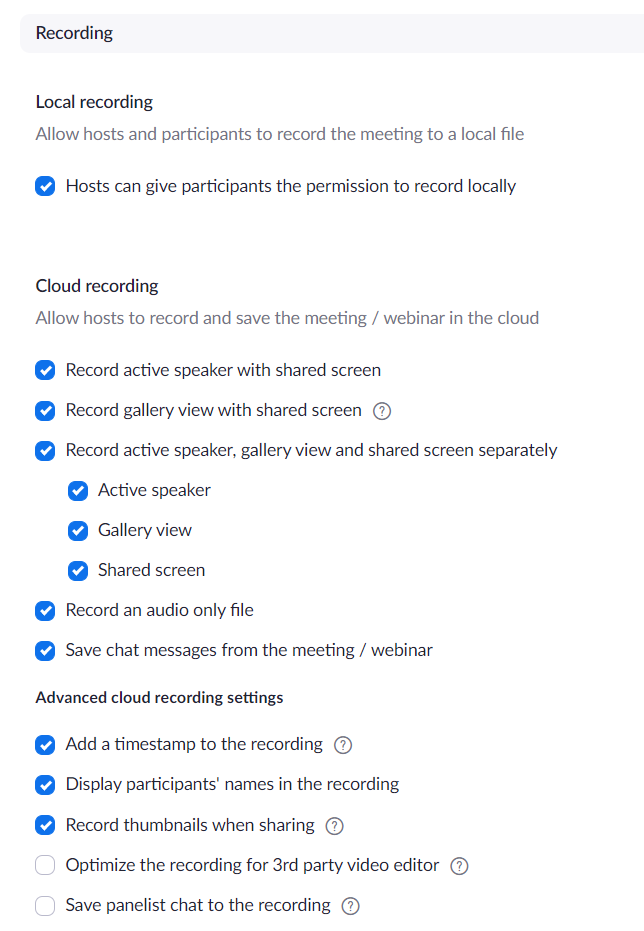
Keeping that in mind, let’s look at what settings we can choose for a video recording. Here you can see which settings I apply for my video recording:
And here’s how it looks like when the active speaker is shown on the screen:
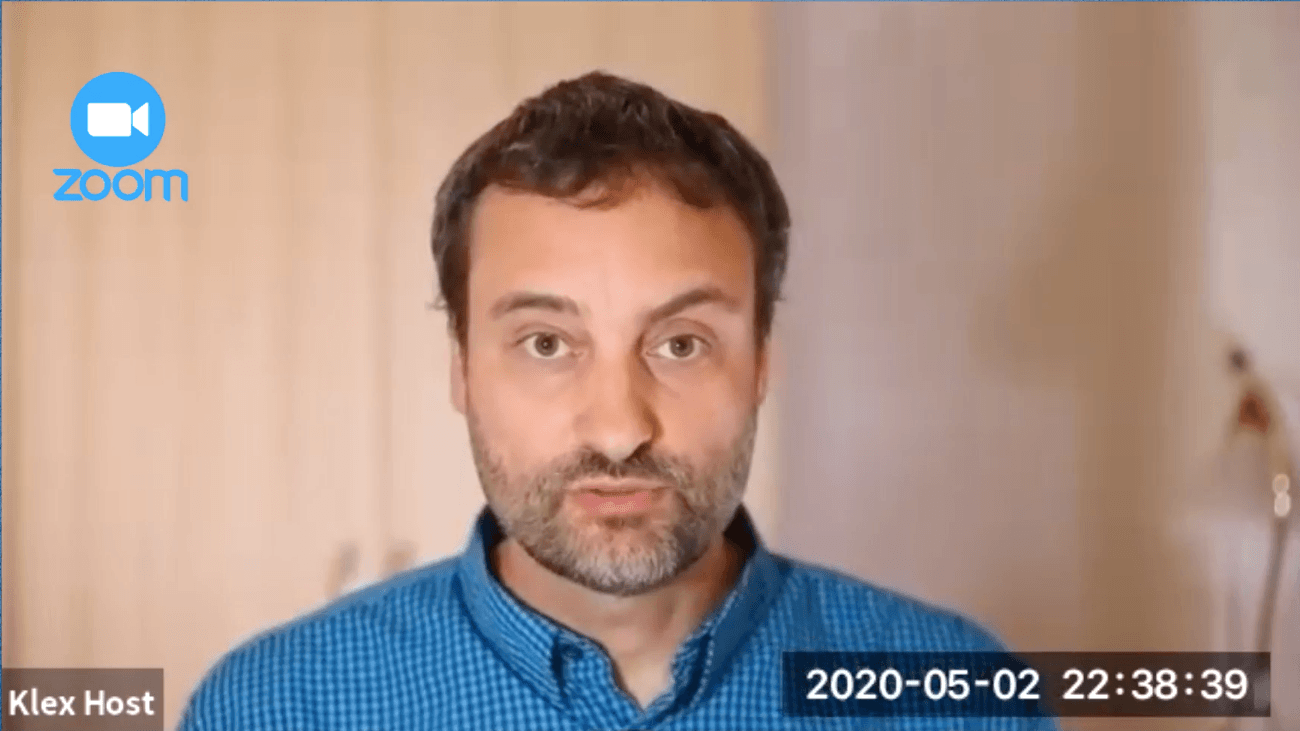
In my settings, I selected participants’ names to be shown at the bottom left and a timestamp on the right corner.
Make sure you select these settings so you can have separate active speaker and gallery view recordings available to download after the interview:
You might want to have these separate video recordings while editing your video so you can add the active speaker thumbnail whenever you want on the screen sharing, just like this:
Layouts for video interview
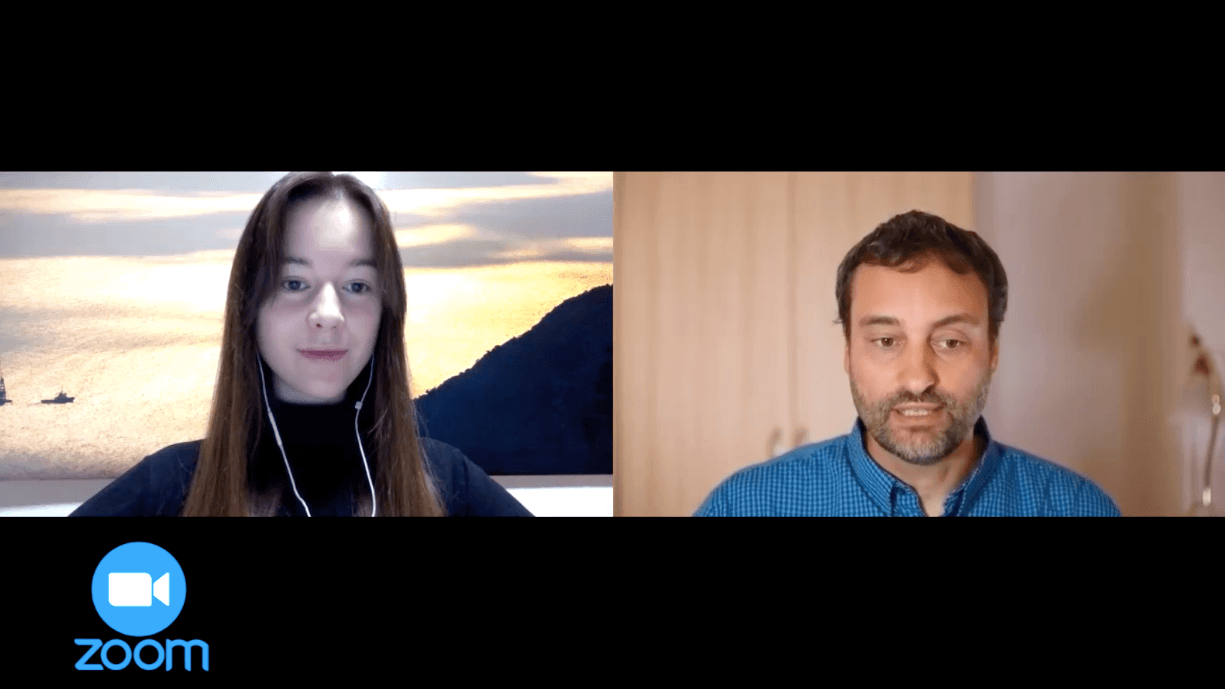
Before recording a video interview with a guest, decide which layout you want to display – you can choose either “Gallery view” where all the guests will be displayed on the screen at once or “Active speaker” view, where only the person talking will appear on the screen.
Here’s how “Gallery view” looks like:
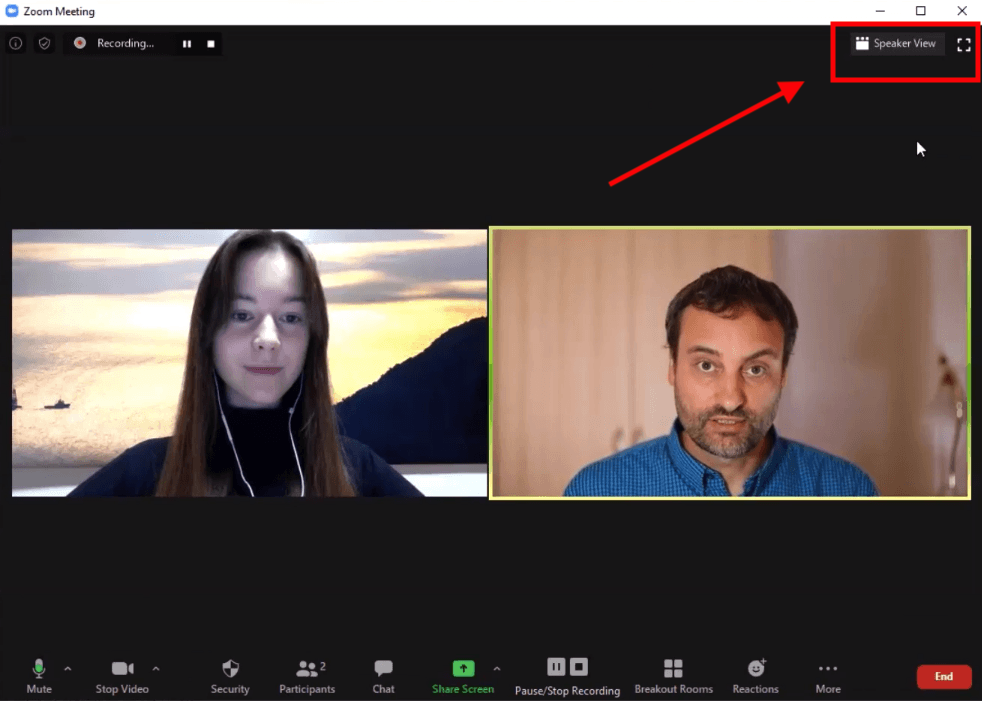
And this is what we get when we select “Speaker view” at the top right corner. Basically, whoever starts talking, he/she will appear on the screen just like this:
You can watch this video where you will see how does “Speaker view” works.
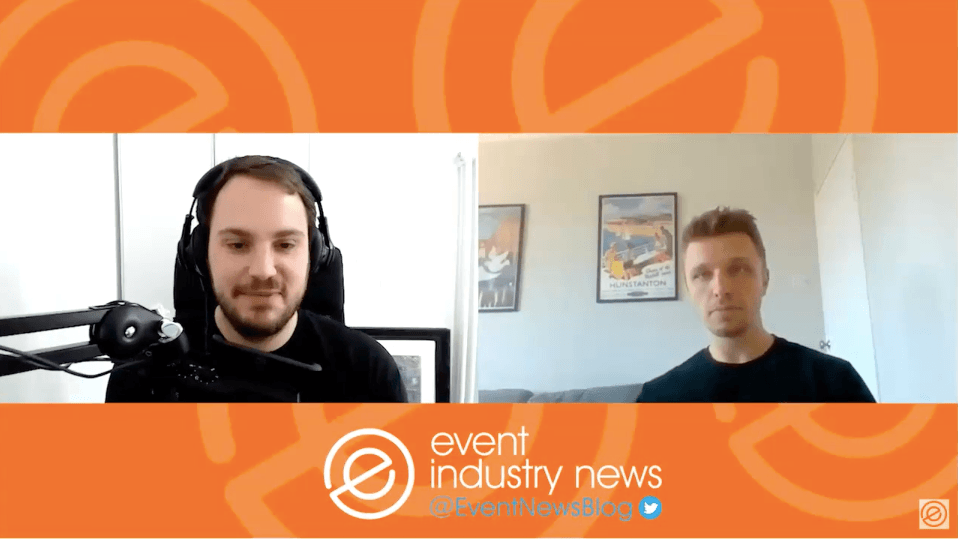
Different designs for the final Zoom video interview
Once you have the final result, you will see there are black empty margins at the top and bottom of the video interview. However, you can customize the design and make it more appealing. Here’s some examples of how you can turn this:
into something like this:
And that’s it! You now are all set up for your perfect Zoom video interview which you can use for your YouTube channel or virtual event.
If you want to watch more similar content, subscribe to KLEX Events YouTube channel.